(1) PURPOSE OF THE DESIGN GUIDELINES
The City of Kent has a distinct character defined by the architecture of its environment. Preserving the character of the city is important to promote civic pride and economic vitality. Promoting awareness for future generations is a key to retaining the city's appeal and success. Recognizing the importance of the city's architectural history and aesthetic help complete the steps needed to keep the city's integrity intact. This recognition can be achieved through education, effort and imagination. These enduring attributes create an inviting place for visitors and residents as well as a pleasant working environment.
Kent's physical attributes are defined by its wonderful location on the Cuyahoga River, the Ohio and Erie Canal and the Atlantic and Great Western Railroad. These particularly charming assets of the city determined the social and economic history of Kent. The physical attributes of the defined area are collectively referred to as a cultural landscape. Cultural landscapes are developed over time and can be read and studied by the form and type of the buildings and landscapes that remain.
The City of Kent is known for taking advantage of the natural resources of the area and keeping up with the changing modes of transportation. The city was established because settlers saw the potential and the power of the Cuyahoga River, thus sparking the initial growth of the community. The canal and railroad followed soon thereafter, creating an economic growth and boom for the emerging city. These times of growth were influential to the city's planning and architecture and are still apparent in the physical form of the city.
These Design Guidelines provide assistance in maintaining or improving the present quality of life through preservation and rehabilitation of the city's architecture while accommodating new construction and modifications. This document provides tools, resources, and design guidance for application to numerous circumstances and settings. Illustrative examples and photographs are included to assist property owners with understanding specific situations. These Guidelines will be used in conjunction with one or more overlay districts designated by Kent City Council as outlined in Chapters Section 1111.04 of the Kent Zoning Code.
New construction near historic structures, or in an historic district, should complement and support the surrounding context in order to uphold the historic integrity of the city, be it traditional or contemporary stylistically.
The Guidelines are based upon the ideas and values set forth by the United States Secretary of the Interior's Standards for Rehabilitation. The Standards pertain to the repair or alteration of historic properties and have been this country's model for preservation practice for more than forty years.
(2) DEVELOPMENT OF THE DESIGN GUIDELINES
The City of Kent currently has three National Register Historic Districts and numerous properties listed in the National Register of Historic Places. Kent has a great collection of rich and diverse architecture that reflects the history of the city through the years. Kent's Design Overlay District gives the community an opportunity to protect the unique character of the area without having to rezone other districts.
The Kent Design Guidelines are intended to assist the community in preserving and enhancing places of special character. These guidelines are written to be utilized by property owners, tenants, building managers, property caretakers, architects, and builders that would be conducting work affecting an historic property. The Guidelines provide a framework for making good decisions about rehabilitation and new design. Recommendations, photographs and drawings offer information and advice on how to achieve appropriate design solutions for various types of properties within the overlay district(s) and also throughout the City of Kent.
The Guidelines present recommendations with the idea that it is better (also less expensive) to repair rather than to replace an original feature. However, these Guidelines are made to be flexible and serve as guidance for creative design solutions. The format of the guidelines begins with an historical overview of the City of Kent and then continues to discuss the different architectural styles that can be found in Kent. Design Principles for a building addition or constructing a new building adjacent to historic properties are also discussed within the design guidelines. Finally, the issues of site considerations, accessibility, graphics / signage, building color, and demolition can be found.
Historic preservation grows to be most successful when a community like Kent comes together with the same purpose in mind: to protect and reuse their historic resources.
The Certified Local Government, which is also a future option for Kent is sponsored by the Ohio Office of Historic Preservation program to encourage and acknowledge those communities with needed support, for processes like those described herein. Certified Local Governments, also known as CLG's, work as a federal-state-local partnership. The communities that become part of the CLG program benefit by receiving encouragement, education and funding through federal grants. The process of the Design Guidelines is meant to protect and enhance the overall value of the property while accommodating a contemporary use.
(3) DESIGN GUIDELINES GOALS
• Achieve good design to help economic vitality and sustain property values.
• Ensure that visual identity remains cohesive.
• Facilitate connectivity with Kent State University.
• Assist with the transition from an Architectural Advisory Board to an Architectural Review Board, which functions as one part of the City's overall development review process.
• Assist developers with design guidance; educate public about good design and incentives.
• Make Kent a destination place for visitors.
• Attempt to preserve, when possible and practical significant structures.
(4) PROCESS
In order to bring about a document that can be supported by the public, it was essential that there be public involvement in the process. Sponsored by the City of Kent, the Burbick Foundation, and Main Street Kent, this project began with stakeholder participation, has been sustained by public input, and will culminate with a presentation to the City Council.
The committee responsible for following this project through to completion was comprised of building owners, design and planning professionals, real estate professionals, developers, Kent homeowners, a University representative, and other active members of the Kent community who met on a regular basis to review, critique, and react to recommendations. Because this committee was tireless in their efforts to review and improve the document, the Design Guidelines for the City of Kent is well-vetted.
In the initial stages, as history and documentation were gathered, stakeholders from many different corners of the Kent community gathered to share and learn about the process of developing and implementing design guidelines. At two separate stakeholders meetings, business owners, homeowners, landowners, designers, representatives from the City and Kent State University joined developers, attorneys, members of Main Street Kent and the Kent Historical Society to discuss their ideal visions for the city. Even more exhilarating was the pride and passion with which each person described the current attributes of the Tree City.
From these conversations, several goals were established. (Goals are listed in Appendix A(3) in the "Development" section of these guidelines.) In order to invite input from another group of community members, these same goals were presented at a large and open public meeting held at the Kent Stage. At the end of the meeting, the participants were invited to prioritize the goals passed on to them by the stakeholders groups.
Overwhelmingly, the top goal selected was:
"Perpetuate good design to help economic vitality and to sustain property values."
The second goal selected was:
"The City can remain cohesive in visual identity."
The two goals ranking third are:
"Better connection with the University" and
"Transition from Architectural Advisory Board to Architectural Review Board."
Ranking these few goals ahead of the others does not diminish their significance entirely. The remaining goals may be lofty but also may be achieved by working toward the above priorities.
"Assist developer with guide to design."
"Education. General Public should become aware of value of good design and the incentives to reach it."
"Can we make Kent a fun place to be? A destination point for visitors."
"Save significant structures, demolitions should be reviewed, as should what takes its place."
"Define the boundaries of a district, but guidelines should help all of Kent."
With the information gained from the stakeholder and public meetings, the consultants assembled this set of Design Guidelines. The first and second draft copies were reviewed by the original committee. The presentation of the final draft was given at the April 22, 2009 City Council meeting. On November 18, 2009, Kent City Council adopted the Guidelines for the purpose of using the Guidelines in relation to projects which are receiving some form of City funding or financial assistance. The present effort would adopt the Guidelines as an overlay district in one or more areas of the City along with specific criteria and procedures for their implementation.
This process meets the criteria for the Certified Local Government application requirements.
(5) BENEFITS TO A PROPERTY OWNER
Good design and well-executed design guidelines have proven to be beneficial to both the property owner and the community because they sustain social and economic growth. Individual property values are enhanced through good design, and collectively, these properties can greatly increase the appearance of an entire district. The area becomes a destination that people want to visit and gives the city an identity. A place is created where the community interacts, thereby strengthening the ties between its members and the surrounding area. Activity supports local businesses including restaurants, retail, and entertainment establishments. The return on the investment in time and expense is to achieve good design in preservation, restoration, renovation, and new construction, a prolonged value that far exceeds the initial investment.
Economic benefits (besides the obvious increase in pedestrian traffic) can include use of preservation grants and loans, rehabilitation tax credits, energy efficiency tax breaks, and participation in Certified Local Government grants and loans. Design guidelines not only provide an opportunity to increase property value and appearance but become a tool in protecting the value of public and private investments. Areas that may be threatened by poorly- managed growth now have the opportunity to be managed by the community. There is also the benefit of attracting good developers to a thriving well-maintained community. The Guidelines are a means to assist clients and their designers in preliminary design or maintenance work; they will help keep the character of the town intact and the community thriving.
(6) FOR MORE INFORMATION ON THESE AND OTHER PROGRAMS TRY THE FOLLOWING WEBSITES:
• National Park Service, www.nps.gov
• Ohio Preservation Office, www.ohiohistory.org/resource/histpres
• Main Street Kent, www.mainstreetkent.org
• City of Kent Community Development, www.kentohio.org/dep/comdev.asp
(7) THE HISTORY OF KENT
The native Iroquois tribe used the Cuyahoga River's resources and Standing Rock as a landmark. Early settlers of Kent were unquestionably attracted to the area because of the Cuyahoga River. The settlers were attracted to the land because of the water power of the Cuyahoga River. The river had enough force to operate numerous mills, distilleries, tanneries and forges.
Aaron Olmstead, a business man from Connecticut saw the potential of the land and bought the twenty-five (25) square mile township which he named after his son, Franklin. In 1805, the Haymaker family became one of the first to establish themselves on what is now known as Kent. Jacob Haymaker, a German millwright and carpenter, bought 8 township lots along the river and Haymaker sent his son John with his wife and three children to begin construction of a mill and dam. The Haymakers were followed by many other businessmen that saw the potential of the river.
Later, in 1810, a growth in population established the community that came to be known as Franklin Mills. The residents considered the area divided and referred to it as the "Upper Village" and "Lower Village."
In 1825, the "Upper Village" was recorded as the village of Carthage but the name did not stick; the residents preferred to use the name Franklin Mills. During the era of the stage coach many rivalries grew between the two villages; businesses began advertising wars to persuade visitors passing through to come to their business rather than the one in the rival village. During these years of growth, a sawmill was built in 1814, which allowed residents to build frame houses rather than log cabins.
[1 Grismer, Karl H., History of Kent (Record Publishing Co., 2001)17.]
In 1816, the Franklin Mills community constructed a small cabin for their first school, and in 1820, the first post office was established: George DePeyster became the first Postmaster. By 1835, Franklin Mills' population grew to 1,400 people and included gristmills, woolen mills, cabinet shops, glass shops and tanneries.
The development of the Pennsylvania and Ohio canal began in the Franklin Mills area during the 1830s and was completed by 1840. The construction of the canal brought a lot of business to Franklin Mills and was a fundamental part of the growth of the community. This area is now known as the business district. The canal was a great resource that connected Franklin Mills to Pennsylvania, Ohio, Lake Erie and Akron. The canal era ended due to the development of the railroad.
Train tracks were laid in Franklin Mills by 1863. In 1864 the trunk line was complete connecting the town to St. Louis and New York. Marvin Kent had a big part in getting the Atlantic and Great Western railroad routed through Franklin Mills. The railroads helped keep the mills in business and thriving. Due to the location of Franklin Mills, it became the chosen spot to build the railroad shops which offered several hundred men jobs in the area and turned Franklin Mills into a prosperous railroad center. The residents were so grateful to Marvin Kent for his part in bringing railroads to Franklin Mills that they changed the name of the village to Kent in his honor. The state of Ohio made the Village of Kent official in 1867 by acknowledging the new name and incorporated it. In 1875, a new railroad depot was opened in a large brick building currently housing the Pufferbelly Restaurant on what is now Franklin Avenue.
In the early 1900s, there was a shortage of nearly 5,000 teachers in the state of Ohio. A law was passed looking for two new locations for a Teachers College: one in the western half of Ohio and one in the eastern half of the state. Kent pushed to become home to one of the schools and formed the Kent Board of Trade, and began the slogan "Home of the Hump and Hustle". William S. Kent donated a large area of land to the community for the school.
In 1910 Kent's hard work paid off and the state of Ohio gave Kent the opportunity to house one of the new public teachers' colleges, Kent State Normal School, now known as Kent State University. The arrival of the college generated another boom in Kent. Real estate values around the college drastically increased and more streets were constructed in the area. Construction workers building the college brought business to the town which were later followed by faculty and students.
In the 20th century, Kent saw an industrial boom as businesses considered Kent an excellent site to manufacture goods. The Davey Tree Expert Company is one of the most well-known businesses that was established in Kent; founded in 1909 by John Davey. The Davey Tree Expert Company is a leader in their industry and by 1920 the company was given 14 patents. The company headquarters still remain in Kent, but have additional offices throughout the country and in Canada. The company developed techniques such as line clearance and vegetation management for utility companies and the removal of large trees. The company made significant advances in the technology of bucket trucks, insect control, brush chippers and speed saws.
John Davey's son, Martin L. Davey, is known at a state level for being elected governor of Ohio. Martin graduated from Kent's high school and later attended Oberlin College. Martin was elected mayor of Kent in 1915 and 1917. In 1918 he held a position in the House of Representatives as a Democrat. He was re-elected to the House three more times before running for governor in 1928. After losing his first race he won in 1934 and was re-elected two years later. Martin returned to the family business full-time after serving as the governor.
(8) ENVIRONMENTAL FEATURES
In addition to architectural style, the natural environments in which the buildings are set contribute to the character of the Kent Design Overlay District. The Cuyahoga River flows through the center of the City of Kent. The water source for the gristmills of the original village and later the Pennsylvania and Ohio Canal resulted in the establishment of a thriving industrial town, and the Cuyahoga River remains an important resource of natural beauty and recreation for the community today.
The monumental Kent Dam, hand cut from sandstone in the form of a sweeping arch and the only known dam of its kind attached to a canal lock, still stands as an historic tribute to Kent's industrial past. The dam, built in 1836, has been listed in the National Register of Historic Places.
For environmental reasons, the river has been rerouted through the historic canal lock and the area behind the dam is now home to the green lawn, gardens, and observation platforms of Heritage Park. The majestic waterfall cascading over the dam remains as a symbolic backdrop for the City of Kent.
There are also several wooded parks located along the river's edge. In addition to being sites of scenic beauty and rich ecosystems, these parks also offer a multitude of opportunities for outdoor activities: hiking trails, recreational facilities, observation decks and beach-like landing spots to encourage community participation in the natural environment. Adding to the greenery of the natural landscape, the ambitious effort of planting hundreds of trees around the city, undertaken by John Davey in 1880, resulted in the city of Kent being designated as the first "Tree City" in America. The tree, as a representation of the city of Kent, has earned a place of honor on the official city logo.
(9) ARCHITECTURAL STYLES
Styles refer to trends in design that were influenced by the popular culture of their time period. They reflect fashion, and political and social influences of the day. Typology refers to building form and traditional methods of building, typically handed down through generations, and vernacular styles of local craftsmen. Typology can also refer to the original use of the building, such as a church, school, barn, depot, mill or residence. Residences often exhibit a mixture of styles indicating a transition from one style to the next or later additions and renovations made to the structure in the fashion of that time.
The architectural style of a building is expressed through the structure's character, which is defined by the floor plan and three-dimensional shape of the structure, and expressed through its details including windows, doors, chimneys, porches, and ornament. Kent architecture is characterized by the styles listed on this page. Dates refer to the era of popularity in Kent and in Ohio.
Mid-19th Century
Greek Revival (1835-1860)
Gothic Revival (1840-1880)
Italianate (1850-1880)
Late 19th Century
Second Empire (1855-1885)
Eastlake (1880-1890)
Romanesque Revival (1880-1900)
Queen Anne (1880-1905)
Italian Renaissance (1890-1935)
Neoclassical (1895-1950)
Early 20th Century
Craftsman (1900-1925)
Tudor Revival (1910-1940)
(10) GREEK REVIVAL STYLE (1835-1860)
The Greek Revival style was the dominant style in the United States from about 1835 to 1860. During this time period Americans were looking for a style that represented the ideals of democracy. They wished to distinguish the relatively new country of the United States from England. Classical architecture from Rome and Greece became the popular models. Americans were also very sympathetic to the Greek War of Independence which began in the 1830s. The Greek Revival style proliferated through carpenter pattern books, such as those by Asher Benjamin, and became so popular that it was known as the National Style. The style is found in many forms, based on its geographical location and use (urban or rural/residence or commercial).
Greek Revival's roof and porch are emphasized with a classical entablature, which is made up of a cornice, frieze and architrave. The architrave is typically bold and composed of a post and lintel arrangement. The porches are supported by square or rounded columns, usually of the Doric type. The front paneled door is single or paired and surrounded by elaborate details typically with narrow sidelights with a decorative frame.
The example below was most likely a one and one-half (1-1/2) story Greek Revival structure with a lower slope roof. At some point the roof pitch was changed to increase the house to two (2) stories.
(11) IDENTIFYING FEATURES
Classical entablature
Transoms and/or sidelights
Double-hung windows
Classical details
Greek key ornament
Acanthus leaf ornament
Full-width or entry porches
Square or round columns
Gabled or Hipped Roof
(12) GOTHIC REVIVAL STYLE (1840-1880)
Gothic Revival style first appeared in the United States in the mid-19th century during the Romantic period, when Picturesque Architecture was gaining popularity. Many contemporary publications written at the time sparked popularity, such as A.J. Davis' Rural Residences, A.J. Downing's Cottage Residences and Richard Upjohn's Rural Architecture. These books included drawings, details and landscape plans as a "How To" book.
Gothic Revival structures are medieval in form and have a vertical emphasis found in stone, brick and wood-framed details. This style has steeply pitched roofs and steep cross gables with decorated vergeboards. Tall clustered chimney stacks occur frequently. The windows extend into the gables having pointed arches with a drip-mold above the windows. The doors are decorated very similarly to the windows with pointed arches or other Gothic motifs and a decorative crown. The majority of the porches are one story with a flattened Gothic arch.
(13) IDENTIFYING FEATURES
Steeply Pitched Roofs
Pointed Arches
Vergeboards
Symmetrical
Medieval Form
Vertical Emphasis
(14) ITALIANATE STYLE (1850-1880)
The Italianate style was introduced in America by English pattern books based on the latest fashion overseas. England was influenced by the informal design of Italian style as part of the Picturesque movement. This movement deviated from the formal classical design in search of a style freer in its expression. In America, the style was adapted and embellished, making it unique to the country. American pattern books by Andrew Jackson Downing defined and promoted the Italianate style in America.
Italianate buildings usually are two or three stories and are rarely found in one story. The roof is low-pitched with wide overhanging eaves supported by decorative brackets. Windows are generally one or two pane sashes that are tall and narrow, with arched or curved upper sash. The windows are often decorated with ornate hoods, typically an inverted U- shape. Porches are very common in the Italianate style with smaller entry porches being most common.
Full width or wrap around porches are usually found on larger buildings or on those buildings that are "high style." Front doors can be found in the same shape as the windows with large pane glazing.
(15) IDENTIFYING FEATURES
Wide, overhanging eaves
Two or three stories
Single or paired brackets
Embellished Cornice band
One or two pane windows
Paired doors
Elaborate ornament
Tall, narrow windows
Arched ornate windows
One story porches
(16) SECOND EMPIRE STYLE (1855-1885)
The Second Empire style is named after Napoleon III's reign over France (1852-1870). During his reign, advancements in design and fashion made Paris the world's center for art and architecture. The Second Empire style was considered to be a modern design and reached America by way of England. The most notable defining feature of this style, the mansard roof, was named after the architect Francois Mansart because of his widespread use of this roof type in his designs. This style also was popular for remodeling buildings because the mansard roof provided a full-story attic space (which was not historically taxed as usable space).
The Second Empire mansard roof generally comes in five shapes: straight, straight with flare, concave, convex and s-curve. It is common to find decorative patterns of color or texture on the roof with an iron crested cornice widows walk. Underneath the roof-line the Second Empire is closely related to Italianate style but the eave overhang is not as large and there is normally an arch above the windows.
(17) IDENTIFYING FEATURES
Mansard roof
Dormer windows
Molded cornices
Decorative brackets
Cast iron cresting at rooftop
Brackets below eaves
Cupola covered by roof
Patterned roof slate
Two (2) or three (3) clusters of windows
Projecting central bay
Quoins (corner details)
Many textures and colors
(18) EASTLAKE STYLE (1880-1890)
The Eastlake style is named after Charles Eastlake, an English architect who influenced building design through the publication of his book Hints on Household Taste (published in 1868). This look deviates from the curvilinear earlier styles in favor of angular, notched, and carved elements influenced by Medieval designs. Incised patterns were commonly found on hood moulds and brackets. Three-dimensional ornamentation became popular to this style because of the new advances in technology for woodworking machinery, such as scroll saws, chisels, power lathes, and spindle shapers. The power lathes and spindle shapers are the two tools that made the fancy details and posts. Eastlake style ornamentation was commonly applied to other Victorian buildings, primarily designed in the Queen Anne and Stick styles.
(19) IDENTIFYING FEATURES
Large, scrolled brackets
Floral ornamentation
Geometric ornamentation
Incised decoration
Oversized elements
Angular, notched elements
Asymmetrical design
Many textures and colors
(20) ROMANESQUE REVIVAL STYLE (1880-1900)
Architect Henry Hobson Richardson designed in the fashionable styles of the second half of the 19th century, including Second Empire, Queen Anne, and Stick. He later adapted these styles creating a new style that became known as Richardsonian Romanesque. This style creates the appearance of a massive and solid structure, causing it to become popular for large public buildings of that time.
The common Romanesque Revival form is a hipped roof with a cross gable, but was also built-in town house form. The buildings are often constructed out of rough-faced stonework with two or more colors creating decorative wall patterns. Wide-rounded arches are a distinct feature above windows, entryway or porches. The arches are supported by massive piers or are built into the wall. The Romanesque Revival was less common in residential design in Ohio because its solid masonry construction was expensive.
(21) IDENTIFYING FEATURES
Round-topped openings
Arches rest on columns
Deeply recessed windows
Grouped windows
Round tower
Asymmetrical facade
Rough-faced masonry walls
Two or more colors
Many textures of stone
(22) QUEEN ANNE STYLE (1880-1905)
The Queen Anne style originated in England with a group of architects under the leadership of Richard Norman Shaw, who also introduced the style in America during the Philadelphia Centennial Exhibition of 1876. Pattern books detailing the design encouraged the advancement of this style across America. Popularity of the Queen Anne style grew because the defining decorative elements could be pre-cut and transported by railroad. A boom in the economy during the time this style was popular resulted in many structures being built in the Queen Anne style.
The Queen Anne roof is irregular in shape and is steeply pitched with a dominant front-facing gable. Methods are used to avoid a smooth-walled appearance such as patterned shingles and cutaway bay windows. The building is normally asymmetrical with a one-story high partial or full-width porch.
Four decorative detailing types are common on a Queen Anne style building: spindle work, free classic, half-timbered and patterned masonry. Spindle work is present on the porch balustrades and suspended from the porch ceiling creating a frieze. Free classical columns are on the porches usually full height or on a raised pedestal. The supports are often grouped together in three but lack the decorative detailing.
The porch is supported with solid spandrels and often has half-timbering or decorative timbering details on the front gables or upper stories.
(23) ITALIAN RENAISSANCE STYLE (1890-1935)
By the late 19th century many American Architects and their clients had visited Italy to see and experience the style first hand. Technology was improving and so was the quality of printing. The use of photographs to document the buildings became popular. The earlier Italianate style was based on pattern book drawings by professionals with no firsthand knowledge of Italian buildings. After World War I, masonry veneering was perfected which allowed buildings to closely imitate the stucco or masonry walls of the original Italian models.
Italian Renaissance structures are symmetrical in form and typically found with low pitched roofs that are covered in ceramic tile including broadly overhanging boxed eaves with decorative brackets below the eaves. All openings have arches above them and the upper windows are less elaborate than the first floor full-height windows. The entrances are recessed and supported with small classical columns or pilasters.
(24) IDENTIFYING FEATURES
Low-Pitch Roof
Arches Above Openings
Symmetrical
Ceramic Tile Roof
(25) NEOCLASSICAL STYLE (1895-1950)
Neoclassical style sparked interest after the World's Colombian Exposition in 1893 and the 1901 Pan-American Exhibition in San Francisco.
Famous architects of that time showcased their dramatic designs of white colonnaded buildings. The buildings of the Exposition were monumental and inspired many commercial and public buildings thereafter. In the first half of the 20th century Neoclassical became a popular style for domestic buildings throughout the country. The first wave of these buildings occurred from 1900-1920 and displayed hipped roofs, elaborate classic columns, and pedimental entries. The second phase occurred from 1925-1950, which included side-gabled roofs and simple columns.
Neoclassical houses normally have a boxed eave with a moderate overhang and employ full-height porches that are supported with classical columns, with Ionic or Corinthian capitals. The facade is symmetrical with a central door and balanced windows. The door is elaborately decorated and the windows are double-hung and rectangular.
(26) IDENTIFYING FEATURES
Dominate front porch
Roof supported by columns
Ionic or Corinthian capitals
Symmetrical windows
Center door
Elaborate doors
Boxed eave
Moderate overhang
Rectangular windows
Pediments
(27) CRAFTSMAN STYLE (1900-1925)
The Craftsman style was part of an international movement of style, art, and philosophy with William Morris, a 19th century English designer, being a large part of the movement. The Craftsman style in the United States was inspired by two California brothers: Charles Sumner Greene and Henry Mather Greene. Their designs were influenced by the English Arts and Crafts movement, and Oriental wood architecture. The designs focused on the natural beauty of the materials, and detailed craftsmanship with simple clean lines. Ornamentation was kept to a minimum. Publications of Green & Green's designs in magazines such as the Ladies Home Journal and Good Housekeeping helped to popularize the style. Furniture manufacturer Gustav Stickley published a popular magazine called The Craftsman, featuring both architectural and furniture designs.
The style became so prevalent that a flood of pattern books was produced. Some companies, such as Sears, offered entire packages of pre-cut lumber, doors, windows, plaster, trim, and fixtures.
The Craftsman style porch is supported by columns that are short and square and sit upon simple pedestals; these pedestals, columns, and piers frequently extend to the ground. The most familiar characteristic is the roof overhang. The roof rafters are usually exposed and sometimes have decorative details. The doors and windows are similar to Prairie style homes. The dormers have gables with exposed rafters at the end. The most common wall-cladding is wood clapboard and wood-shingles. However, stone, brick, concrete block, and stucco variations can be found in northern or mid-western states.
(28) IDENTIFYING FEATURES
Low pitched wide gable
Unenclosed eave
Rafters exposed
Full or partial-width porches
Tapered square columns
Columns extend to ground
Beamed ceilings
Casement windows
(29) TUDOR REVIVAL STYLE (1910-1940)
The Tudor Revival style is modeled after a variety of late Medieval English styles; the prototypes range from thatch-roofed folk cottages to grand manor houses. The traditions are openly mixed in their American Eclectic representation but are unified by distinctive characteristics such as steeply pitched roofs, front-facing gables and a prominent entry facade. Nationally, the style saw its height of popularity beginning at the end of World War I and continuing through the 1930s.
The buildings frequently have steeply-pitched roofs with the facade dominated by one or more prominent cross gables. The windows are tall and narrow with multi-pane leaded glazing (diamond patterns are very common). The chimneys are massive and are usually crowned by decorative chimney pots.
(30) IDENTIFYING FEATURES
Steeply pitched roof
Stone, brick or stucco
One or more cross gables
Decorative half-timbering
Tall, narrow windows
Massive chimneys
Decorative chimney pots
Gables overhang
Asymmetrical plan
Round or Tudor arch entry
Leaded glass windows
(31) ART DECO STYLE (1925-1940)
Art Deco style grew during the time period between the two World Wars. The Exposition des Arts Decoratifs, an exhibition held in Paris in 1925, was part of an International Style movement. It was inspired by Cubism, Futurism and Constructivism; America's obsession with the future, speed, and transportation (such as the car and train) was also a driving force behind this movement. The style was honest and simple, but most of all it was functional. The structures combined rectilinear massing, futuristic images, stylized ornament and polychromatic effects. This glamorous style changed the shape of virtually everything in America, from the American home to jewelry and other decorative arts Deco with some Gothic details.
(32) IDENTIFYING FEATURES
Smooth and flat wall
Geometric designs
Vertical emphasis
Inspired by machines
Inspired by movement
Horizontal band of windows
Curved window glass
1/1 windows
Metal doors
Metal window sash
(33) APPLICATION REVIEW AND PROCEDURES
The process to review proposed work within the Design Overlay District (presented herein) is defined in Section 1104.01
of the Kent Zoning Code.
(34) ARCHITECTURAL REVIEW BOARD
Work that will affect the exterior of a building in the applicable overlay districts will be required to obtain a Certificate of Appropriateness issued by the Architectural Review Board of the City of Kent. The Certificate of Appropriateness when mandatory must be issued for a project prior to the issuance of a Building Permit.
(35) USE OF THE GUIDELINES
These Design Guidelines must be used in conjunction with new construction and existing building alterations, signage and as otherwise applicable with the applicable Design Overlay District(s) and for the use of the Architectural Review Board when reviewing projects subject to these Guidelines. These Guidelines are based upon the Secretary of the Interior Standards for Rehabilitation (see Appendix B), explain how to look at an historic structure or structures within the district, and how to evaluate its characteristic for preservation, rehabilitation or suitable new additions within the overlay district(s). These standards are used for new construction to ensure that it is compatible with the existing nearby structures and amenities. Those individuals using the Guidelines either voluntarily, in conjunction with a City assisted project, or who are using them in conjunction with a mandatory review within one or more of the Design Overlay District(s) in the City are encouraged to read these guidelines in their entirety. Those sections noted in bold print are especially important and are prescriptive in nature. These prescriptive elements identify the key points to be considered by the Architectural Review Board in their review of an application for a Certificate of Appropriateness.
(36) FINANCIAL INCENTIVES
The City of Kent has chosen to mandate the use of the Guidelines and the review process for projects that are funded, in whole or in part, by the City of Kent If a property owner chooses to take advantage of the federal or state historic preservation tax credits, that owner must follow the Standards for Rehabilitation (Appendix B); which are the principles upon which the Kent Guidelines are based.
WHAT DOES ADOPTION OF THE KENT DESIGN GUIDELINES MEAN?
Adoption of these Design Guidelines means that the citizens of Kent wish to be proactive in the success of their community, acknowledging Kent's special heritage and its unique and eclectic architectural personality. The Guidelines are a tool for the community, especially within the recommended Design Overlay District and any future designated area, to protect and support the character that brings such pride.
The Guidelines are a tool to assist the public and to assist the Architectural Review Board so as to support consistent recommendations. In the end, the goal declared by the community throughout this process is: Perpetuate good design to help economic vitality and sustain property values.
(37) PRESERVATION PHILOSOPHY
The preservation philosophy that these Design Guidelines aim to uphold is based on the Secretary of the Interior's Standards for Rehabilitation. The philosophy's purpose is to retain original or historic building materials to the greatest extent possible and to avoid creating a false historic appearance when elements must be replaced. Replacement materials should match the originals in size, color, and texture. Substitute materials such as vinyl for wood should be avoided. New additions and new construction may be distinguishable from the historic while being compatible with the existing structure or surrounding structures. Additions and new construction should be reversible, so if removed, it will not impair the historic structure's form or integrity.
(38) PRESERVATION PRINCIPLES
Refer to the Secretary of the Interior's Standards for Rehabilitation located in Appendix B.
(39) DESIGN PRINCIPLES BUILDING TYPOLOGY
In addition to understanding building styles, it is important to understand general building types. Building type or typology is the form a building takes related to its materials, function, and visual organization. It also can describe a regional or vernacular method of building, related to form rather than style and ornament. It is important to be able to describe, critique, and prioritize these components of architecture. Successful design within an existing historic context includes both an understanding of the typology of the existing structures, as well as the meaning of their style in a place in time.
(40) FABRIC AND OBJECT BUILDINGS
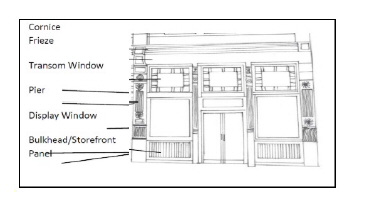
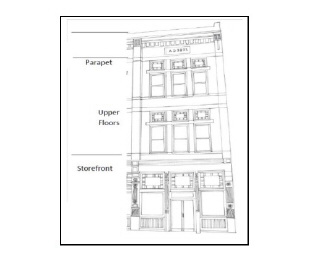
Within the context of the Kent Design Overlay District, there are two principal building categories: Fabric Buildings and Object Buildings. Fabric Buildings make up the sense of place and they define general character and set scale. Fabric Buildings typically have a commercial or residential use. They are the majority of the buildings and are usually built during the same time period. They are principally a commercial block type with a basic three-part form: a glass storefront base, upper floors with "punched" window openings, and some form of cornice. The majority have a flat roof.
Object Buildings are buildings of cultural or civic importance and have a symbolic presence to Kent. Object Buildings can include churches, post offices, theaters, libraries, town halls, courthouses, and other civic or cultural institutions. These buildings have a variety of forms and visual organization and are not necessarily part of the town's standard fabric.
When considering the application of design principles to new work in an existing context, the priority of the design principles ranges from the general to the specific. A well designed building placed poorly on the site undermines the overall design. A poorly proportioned building with elaborate details will fail to fit within an existing context because the observer sees the form first and the details second. Conversely, a building placed and proportioned appropriately with simplified or contemporary details will work well within an existing context. Therefore, the priority of the design elements should be as follows.
Building Placement
Form
Solid/Void Pattern
Facade Organization
Materials/Color/Texture
Details
(41) BUILDING PLACEMENT
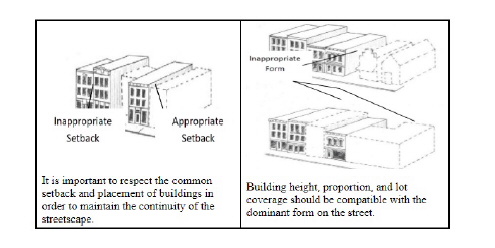
Within an existing context of historic buildings, there is a customary or prescribed building placement. It is important to respect the common setback and placement of buildings in order to maintain the continuity of the streetscape.
This should be regarded as a "build to" line, as well as a building setback.
Consideration should also be given to the vistas both along the streetscape or roadway for structures set near the road, and from the road for structures set back away from the road. Carefully consider any new construction adjacent to the existing structures: will the new construction interfere with the views?
(42) FORM
Whenever possible, the existing historic context of the building form should be respected, including the volume of the form in relation to its site. Building height, proportion, and lot coverage should be compatible with the dominant form on the street. Orientation of the form to the street also should be the same as the context. For example, if all of the buildings on a given street are gable-fronted facing the street, new infill buildings should have a similar form and orientation.
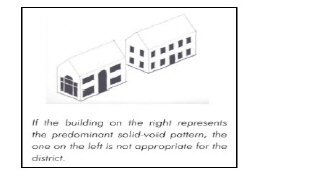
(43) SOLID/VOID PATTERN
The ratio and pattern of wall-to-window openings is common within a given building type and age. Respecting this pattern helps to unify the streetscape.
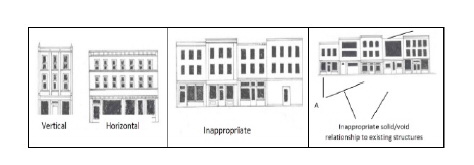
(44) FACADE ORGANIZATION
Horizontal versus vertical facade organization of architectural elements is usually similar within a given context. Some buildings have prominent horizontal elements such as belt courses, continuous sills or lintels, or projecting cornices or entablatures. Other buildings exhibit an emphasis of vertical elements such as continuous pilasters that separate the facade into spandrel panels.
When a dominant pattern of either horizontal or vertical organization exists in the historic context, this pattern should be imitated by any new construction.
(45) MATERIALS/COLOR/TEXTURE
Selecting materials that are compatible in color and texture with adjacent structures helps to create a unified design within the district.
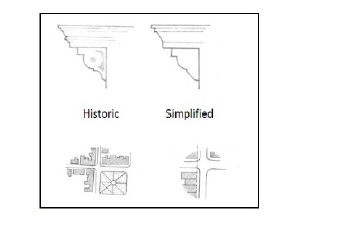
(46) DETAILS
Imitating details of historic structures exactly when creating new structures is generally not necessary or desirable. Respecting the general placement, form, visual organization, colors, and materials within a given context is sufficient to create a new building that is compatible. It is not necessary to create a replica of an historic building by copying exact details. Simplified details of similar proportions to those found within the district are sufficient.

(47) GENERAL RECOMMENDATIONS
(48) IN CARING FOR KENT HISTORIC STRUCTURES
• Inspect and maintain building elements on a regular basis.
• Repair before replacing elements or materials. Replacement is an option only after all other possibilities have been considered.
• Avoid adding elements to a building that were not originally present.
(49) MISSING ELEMENTS
• Replace or reconstruct the missing element using materials that match the original as closely as possible.
• If no evidence can be found to document the element's original appearance, replacement should be consistent with the building's size, scale, and materials. The replacement should be simplified to avoid creating a detail that may not have been part of the original design.
• Examining other buildings of the same architectural style can help determine what may be appropriate.
(50) DETERIORATED ELEMENTS
• Avoid giving a false impression of historic character by use of ornament not appropriate to the time period and stylistic influences. Repair deteriorated elements as soon as possible to prevent further damage or loss of material. If an historic element is deteriorated beyond repair and removal has been approved, document with photographs and measurements before removal. Then reproduce the element, matching the original design and materials.
(51) NON-ORIGINAL ELEMENT
• If an element has been previously replaced, consider retaining the existing element if it is unique, aesthetically complements the building, or is a good example of what was in style in its own time (i.e., a well-designed and constructed 1880's porch on an 1840's house).
• If the element is considered inappropriate for the building, replace the element with one that is appropriate.
(52) SALVAGE MATERIAL
• Avoid adding elements to a building from other structures. This generally creates a false history and would be inappropriate. Respect each building for its own design and style. If salvage material is used for repairs, such as old brick that matches the correct size and color, it is appropriate to mark the salvage items on the back so that they can be identified later.
(53) STOREFRONT
The main purpose of storefronts and their windows is to display items for sale in a store. They are, however, a very important part of the pedestrian experience, influencing the public perspective of the district.
Traditional storefronts were regularly designed in a three-part composition: a fairly low bulkhead at the base, large glass display windows, and transom windows at the top providing additional natural light to the interior. Transom windows often had small panes of prism glass that gathered light and projected it toward the rear of the stores.
Surviving historic storefront elements (such as bulkheads, wood or metal trim or window hardware, and transom windows) should be retained if at all possible. Such elements are part of the fabric of historic Kent and contribute to its character and high visual quality. Designs for new storefronts or renovations to existing ones should be respectful of the size and proportions of elements typical of the area's older storefronts. They should, for example, have bulkheads, display windows, and transoms. The storefront must fit within the original storefront opening that is defined by end piers or columns and horizontal members. Piers and columns should remain exposed.
Refrain from making the storefront look like a residence or office through the use of small or multi-paned windows. If necessary, screen large display windows with interior blinds if privacy is desired for an office use.
Traditional materials should be used when storefronts are rehabilitated or reconstructed in older buildings. Bulkheads should be paneled wood for 19th and early 20th century buildings, though ceramic tile was sometimes used, especially in the 1920s. Brick and stucco were not typically seen in the bulkhead area. Display windows usually were supported by fairly light wood or metal framing systems, leaving a maximum glass area. Heavy wood framing or masonry materials were not typically used in the display. Transom windows were commonly framed in wood or metal. The glass was usually clear, to transmit maximum natural light into the store.
(54) DOORS
Entrances of historic buildings have always been one of the main elements that help define the overall style and design of a structure. Typically, the door is the main focus of the entrance.
It is because of this that many historic doors have been decorated and embellished with moldings and other decorative panels and motifs found throughout the structure. In maintaining the general style and importance of an historic structure, it is essential to preserve the value and significance of an historic entrance door.
Historic entrance doors should be preserved and maintained whenever possible. They should be kept in operable condition, allowing for smooth opening and closing. Doors performing poorly should be re-hung before shaving or undercutting. Their hardware and thresholds should be tightened and maintained. Historic doors that do not match the time period of the structure should still be preserved as existing historic doors are more valuable and accurate than any new door designed to match the building.
Only deteriorated or missing portions of an historic entrance door should be replaced. These replaced elements should be reproduced to match the original material and style. If replacement of the entire door is necessary, the original frame should be preserved, maintaining the dimensions and location of the door. Historic hardware and glazing should be salvaged and preserved. It is preferred that the replacement door be a replica of the historic door. If this is not possible the new door should match the style of the historic structure.
A new entrance door to an historic building should be contemporary in design but compatible in size, scale, material and color with the style of the building. Restoration of a missing historic door is appropriate only with historical, pictorial or physical documentation.
Because doors are such a prominent feature in a building, it is essential that the door, restored or reconstructed, hold the style of the structure without altering its character. For example, a residential type door should not be placed on a commercial building.
(55) AWNINGS, CANOPIES, CORNICES & PARAPETS
A. AWNINGS AND CANOPIES
These features are used to shade window openings to keep down the interior heat in the summer, awnings typically made of canvas or similar heavy fabric are mounted on solid metal or pipe frames. Awnings provided protection both from the sun and from inclement weather, and they can often be rolled or retracted to allow the sun into the building during cool weather.
With the current interest in "green" practices, awnings are a highly efficient passive device considered to be a worthwhile investment not just for appearances. Fabric awnings are an appropriate treatment for most residences in the historic districts and for many commercial structures. Avoid fixed, permanent canopies unless it can be shown through research that a building had them in the past and that the canopy design is compatible with the original character of the building and the specific district.
Each window or door should have its own awning, rather than a single full-width awning covering multiple openings or an entire facade. Use a traditional flat, sloping awning. Awnings should have a matte rather than a glossy surface. Avoid rounded or "bullnose" awnings, except at round headed window openings where the rounded awning shape is appropriate.
Awning color is important. Manufacturers can provide durable, long-lasting fabric for awnings in a wide range of colors. Awning colors should be compatible with historically appropriate colors used on the building, avoiding ornate patterns or too many colors.
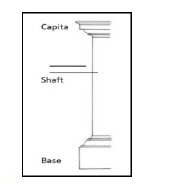
B. CORNICES AND PARAPETS
The cornice is a projecting horizontal band at the top of the facade. Commercial structures often have an additional cornice located at the top of the storefront.
The parapet is a low wall that extends along the roof edge. This wall often has decorative detailing and is frequently combined with the cornice to produce a cohesive crown on the building's facade.
The combined elements are typically a more elaborate design of the cornice and frieze located at the top of the storefront. Ornamentation, including the style of trim and use of brackets to support the cornice, is distinct to a specific architectural style.
Address cornice and parapet repair immediately. If repairs must be delayed, take measures to keep the public safe from debris that may fall from above. The cornice and parapet should not be covered with non-original or incompatible materials, unless it can be demonstrated there are no other reasonable alternatives. Waterproofing treatments can prevent the parapets from properly drying after a rain or snow fall, thereby causing more damage; this type of treatment should be avoided.
C. UPPER FLOORS
The upper floors of the 19th and early 20th century commercial buildings in Kent are designed with a rhythmic pattern of windows and may utilize projections such as towers, oriels, or balconies to create a more three-dimensional appearance.
Windows on the facade of the upper floors are often embellished with ornament that is characteristic of the building's architectural style.
The size, spacing, and proportions of the windows are determined by the overall composition of the building and its storefront. These windows were typically double-hung and contain clear glass panes. The number of window panes relates to the style of the building. Upper-floor windows usually have one-over-one double-hung sash by the end of the 19th century. A few buildings have windows with metal sash, revealing a narrow profile.
The most economical and historically appropriate method for revitalizing windows is to repair the original ones. New windows are generally heavier, with bulkier sash and muntins, and do not retain the appearance of the original windows. The older glass also has characteristic imperfections that new glass will not have.
When windows need to be altered or replaced (in-filled, downsized, or replaced with contemporary windows), original window openings should be maintained at their original size. It may be appropriate to use new replacement windows with the same profile as the originals. Occasionally it is necessary to replace severely deteriorated windows. If approved, new windows need to match the profile, design, material, size, and construction of the original. To discourage vandalism and avoid an abandoned appearance, interior window treatments may be added to unoccupied floors.
Exterior storm windows are recommended to increase energy efficiency and help preserve the historic windows. Storm sash should complement the dimensions of the historic windows. Interior storms may be preferred in limited circumstances involving highly ornate windows. They must be ventilated to avoid condensation build-up on the historic sash and trim. Other windows accessories, such as added shutters or added ornament, are inappropriate without evidence that they were originally present.
Other architectural features that may appear on Kent's historic buildings are balconies, oriels, and projections. Often these types of features were used to give dimension to the upper parts of taller buildings.
Intact architectural projections should remain and be maintained. Reproduction of missing features should be considered when historic documentation presents evidence of the elements' prior existence. Consider uncovering these elements if a contemporary facade hides them from view.
(56) PORCHES
Porches are key elements that help define the character of both the building and the streetscape. Porches are the architectural transition between the public street and the building interior.
It is important to maintain the original porch structure and porch elements, including railings, posts, steps, and ornament. If one of those elements needs to be replaced, duplicate it using the same material and design.
Enclosing a porch is an extreme change to a significant feature and should be avoided. If constructing a new porch to replace a missing porch, model the design on archival or physical evidence to the greatest extent possible. If neither exists, refer to examples of historic porches on comparable structures and keep the design simple.
(57) FOUNDATIONS
Building foundations in the Kent Design Overlay District range from rubble stone (pieces of stone simply picked up and carried to the building site) to cut stone, which was worked by hand, to brick or more modern materials such as rock-faced concrete block and poured concrete.
The purpose of each foundation is the same: the foundation carries the weight of the building down into the soil, spreading the weight so as not to exceed the bearing capacity of the soil.
On some buildings, the foundations rise only slightly above ground level and often are nearly invisible. On others, higher foundations became part of the building's visual character. Many of the Kent's foundations have extra detailing such as chiseled margins, peaned surfaces, or other markings from the quarrying process.
Improper maintenance or alterations to foundations can adversely affect their capacity to function properly. The building can 'settle' resulting in cracked plaster, damaged masonry, and uneven floors. It should be noted that buildings can settle immediately after their construction, causing the same effects along with windows and doors out of plumb. If the initial settlement has ceased, the problems may be minor; continuing settlement is a problem for which to seek professional help.
To prolong the life and reduce necessary maintenance on the foundation, there are a few things that can be accomplished. Soil, paving materials, and plantings beds must slope away from the foundation to provide positive drainage. Check gutters and downspouts or internal drainage systems to be sure that they are operating properly. If gutters are sloped improperly, water will spill down the side of the building. Be sure that downspouts are connected into underground drains or empty onto splash blocks or extensions of pipe that carry the water away from the building's base. Be sure, also, that the downspouts do not empty onto pedestrian paths.
Foundations like to breathe. The easiest way to do that is to allow eighteen (18) to twenty-four (24) inches clear space from the foundation to any planting. Vines and other plants should not be allowed to grow on the foundation. If vines are a desired feature, they should be cut all the way back to the base periodically. They will grow faster and softer if they are "clear cut." Dirt, mulch, and firewood should be piled away from the foundation as they hold the dampness and often hold termites (yes, termites will go through the masonry foundation!)
Most foundations are ventilated. If there are vents in the walls, it is important to keep the air flowing through them; consider adding ventilation if there is none. If security is an issue, consider adding a simple iron grate in front of the opening.
Avoid cutting new openings in foundation walls. If you do such alterations, do it with the advice of an architect or structural engineer to avoid the possibility of weakening the foundation.
(58) EXTERIOR WALLS
Exterior wall materials vary throughout Kent, ranging from brick and stone to several types of wood siding; Kent's buildings are a menagerie of architectural styles.
The general approach to the exterior walls of historic structures is to maintain the original materials: their lifespan increases with proper care. Brick walls need to be kept clean of salt from sidewalks in the winter and vines from the summer gardens. Occasionally, the owner may find the need to repoint the mortar joints. It is essential, to clean using the gentlest means possible. High-pressure water methods can drive water into the walls, causing problems on the inside of the building, and erosion and damage to the exterior.
Whether the walls are brick or wood, the original material should not be covered. The act of covering can be detrimental to the original materials and detracts from the original design, altering the original details and the original colors and textures of the building. If the building has already been covered with a subsequent siding, consider removing it. Substitute materials such as vinyl or aluminum are not appropriate for use in the Kent Design Overlay District. Even on new construction within an historic district, vinyl and aluminum siding may not be appropriate. Refer to the National Park Service Preservation Briefs on Subsistent Materials for further information.
Repair of existing siding is the best option. For repair of severely deteriorated wood siding in the Kent Design Overlay District, new siding should be designed, purchased or milled to duplicate the appearance of the original siding, matching its width, profile, and material. Siding will remain in good condition if the owner ensures the integrity of the finishes on the siding. If the original material was painted, it is necessary to maintain a good painted finish.
(59) ROOFS, GUTTERS, CHIMNEYS, SKYLIGHTS AND DORMERS
Together the roof, gutter, and downspout provide a path for collected water to be removed before it can enter the building. Moisture is a primary cause of damage to building materials and historic elements.
Removing water before it infiltrates the building or the finishes can prevent a multitude of problems and is much easier to do than trying to remove water once it is inside.
The roof of a multi-story commercial structure in Kent is typically flat and sloped only slightly towards the back of the building to assist with water drainage. The roofs on residential or adaptive use residential (now commercial) are most likely sloped and in a variety of configurations. The guidelines are the same, however. If the roof is flat, it is appropriate to use modern materials when the roof is reapplied. Some items to watch for would include proper repair of the parapets and proper detailing for the materials that are applied to the flat roof. Maintain proper drainage from any roof.
On roofs where the materials are seen from the ground or from adjacent buildings, the original material is the ideal roof covering. If the original roof can be repaired, that would be the recommended course of action. Slate, wood, or tile shingles add character to the original design. The original materials, however, have often been replaced. In this case, it is ideal to restore with characteristic historical materials, but using a more economical shingle may be a reasonable approach (an acceptable replacement material).
Changing the configuration of the roof, no matter how slightly, can alter the appearance of a building drastically. Historic ridge caps, weather vanes, dormers and chimneys should be repaired and maintained. Chimneys can sometimes be used for mechanical chases, or capped, but their appearance on the roof is extremely important to the character of the historic building. Ensure also that gutters and downspouts are operational to increase the longevity of the roof and building system.
New skylights (passive solar energy) should be flat to the roof and may be considered on an historic building if they cannot be seen from the public view.
Skylights were used historically as well. Properly restoring an existing skylight is appropriate and encouraged. Often historic skylights were covered to prevent leaking. With new technology, there are some appropriate methods to upgrade historic skylights to prevent leaking and energy loss.
Roof top equipment of any type is detrimental to the appearance of buildings and may be used only if the elements are not visible from the streetscape.
(60) OUTBUILDINGS
The description of "outbuildings" includes the garages, sheds, barns, and carriage houses often associated with older residential buildings. Sometimes, these buildings reflect the architectural design of the house with which they are associated. Often these structures are simple, utilitarian design.
Because outbuildings contribute to the area's overall character, property owners should give due consideration to their care and construction. Original outbuildings such as garages, carriage houses, sheds, and barns should be left in place and repaired as necessary. These structures add variety and character and their removal should be avoided. When outbuildings need repair or when deteriorated elements must be replaced, use new materials that match the old as closely as possible. Avoid modern materials that are incompatible with original designs of these structures. Newly-constructed outbuildings should take design cues from the older nearby structures. The design should use forms, massing, roof shape, materials, window and door types, and detailing similar to those found on the main structure or other nearby outbuildings. The goal should be to create a new building compatible in appearance with those already in the neighborhood.
(61) SIGNAGE
Signs are often controversial; perhaps it is because the contents are so personal. The sign is the face the business displays to the public with importance similar to that of the building's façade. Occasionally, a sign is deemed by popular opinion to be offensive. Ideally, popular opinion is not the most positive approach, nor the most direct approach, to good design.
In an effort to quell the controversy over signage, many cities and towns have zoning ordinances to standardize sign size, placement, content, construction, and illumination.
Kent's sign requirements are currently included in the Planning and Zoning Sections of the Codified Ordinances and can be enforced in a manner similar to any other zoning violation. Future coordination with the current sign regulations and these Design Guidelines should be a goal for the city.
The Zoning requirements for signage must supersede these Design Guidelines, however, upon recommendation by the Architectural Review Board, the City's Board of Zoning Appeals may consider the granting of a zoning variance for a sign within the Design Overlay District.
Sometimes overlooked, the sign is a powerful tool for advertising and business purposes; however, equally powerful is the image that the sign conveys about a particular business and the commercial district as a whole. The style and design of signage has evolved over time, but its purpose has always been the same: to demonstrate to potential customers and clients the purpose of a business and how to find it.
Early 19th century signs were often painted directly on the building or were painted on wooden signboards that could be attached to the building. Care and maintenance of these traditionally painted building signs should be encouraged. Signs could be mounted flush on the building wall, but could also be suspended out over the sidewalk perpendicular to the building. Historically, these suspended signs were often supported by ornamental wooden brackets. By the late 19th century, there was a greater variety of signage types and designs. Signs were incorporated as part of the storefront design, some used leaded or stained glass, and some were painted on the inside of display windows. Historic commercial buildings often provide clues to the form and location of an appropriate sign.
During the late 19th century and the early 20th century signs were frequently integrated into the design of the storefronts and buildings. Space above the storefront was often reserved for a sign board or for a projecting sign hanging perpendicular to the storefront. Display windows sometimes held painted window signs.
Fabric awnings also provided location for signage. Signs such as these might contain letters (painted or applied individual letters) or symbols which gave a quick graphic reference to the business inside. These signs reflected appropriate treatments for a commercial district sign by use of quality materials and design, pedestrian scale, proportional size, and appropriate location.
New signage should be designed and constructed using materials and methods that are consistent with the building's architectural style. The size should be limited to the smallest size necessary to reach the public. The Kent Zoning Code defines requirements for the maximum size, number and placement of signs.
Size should relate to the location for which it will be placed on the building. Color and lettering of the sign should complement the architectural character of the building. When attaching the signs, one should be conscious not to damage historic materials. Small signs can be placed at secondary entrances that are accessible to the public in order to identify the business and should also comply with the above recommendations, if permitted by the Kent Zoning Code. Signs that address the second floor may also be allowed if permitted by the Kent Zoning Code.
In an effort to attract attention, signage is sometimes inappropriately designed, sized, and placed on buildings, resulting in a negative effect upon both the business and the entire area. Business owners should remember that treating the signs as an integral part of commercial architecture can have a positive impact on the appearance of the buildings and the historic districts.
The impact signs may have on the district and especially the adjacent structures are important but is often difficult to measure. If the signs are poorly maintained, clearly that can have a negative effect. The current zoning code has maintenance provisions. These guidelines suggest a reasonable approach to the design of the sign, just as one would approach the design of the building.
The use of neon must be regulated by the sign regulations in the Kent Zoning Code. If permitted, such neon signage must not be allowed to flash or appear to move. The guidelines suggest that the signs be stylistically appropriate to the building and to the district. If the building is a 1950s stainless steel diner, neon may be appropriate. If the building is a 1940s theater, a large marquee with flashing lights may be appropriate.
Neither neon nor flashing signage types are appropriate for a converted Italianate home that now serves as offices.
It should be noted that other considerations in the design of the signage would include light pollution and unnecessary use of energy. In a pedestrian friendly downtown district, one may suggest that signs of a more modest scale be recommended rather than those required to be read from the highway. It is necessary to refer to the Zoning Code for the City of Kent along with the Guidelines to be sure that the signage and lighting are appropriately designed.
(62) EXTERIOR LIGHTING
Exterior lighting is a necessary feature of an architectural environment. It is generally used for safety and aesthetic purposes. Lighting allows pedestrians to see where they are going, illuminating a pathway or obstacle in front of them. It instills a sense of security in people while in public spaces. Proper lighting can also provide charm and visual identity to an historic building. Brightening an inviting entry or casting light on an important architectural feature could enhance the character of an historical structure.
Existing historic light fixtures should be preserved and maintained whenever possible. Removing existing lighting could alter the character of a historic structure and is strongly discouraged. Exterior lighting should be used to illuminate entrances, walkways and significant architectural features. It should be appropriate and compatible with the style of the historic building. Lighting should be kept at low levels of intensity so that neighboring properties will not be affected by excess light. New lighting should be minimal; it is recommended that fixtures are simple, durable and discreet. Any new lighting installed on a structure should cause no damage to the building and should be fully reversible.
(63) HISTORIC INTERIORS
Building interiors are generally not "regulated" by City Ordinance. Guidelines are helpful to those building owners who may wish some assistance. For building owners who are taking advantage of The State or Federal Historic Preservation Tax Credit, the interiors are important because The Ohio Historic Preservation Office will request a description of the building's interior.
If a building has an interior with original features, it may be prudent to respect the existing material. It is recommended that owners of historic properties consider maintaining and retaining the interior features of their buildings. Interior features are equally important to understanding a building's historic, architectural, and cultural value.
It is important to research and identify key original elements of the building interior. If possible, retain original floor plans, particularly key circulation elements, such as interior hallways and stairways. Avoid subdividing large spaces unnecessarily joining smaller spaces. Always try to retain the original features such as interior trim, doors, interior hardware, mantels and cabinetry. Avoid "furring out" walls to install insulation or wiring which usually requires removal of the original trim. Installing dropped ceilings or covering original plaster walls with paneling should not be done. Removing plaster to expose brickwork or other masonry that would not have originally been left unfinished is not recommended. It is advisable to not paint millwork or woodwork that has not already been painted. Likewise, the recommendation for traditionally painted surfaces is for a similar finish.
COMMERCIAL USE OF RESIDENTIAL STRUCTURES
When re-using a house to serve a different function than its original purpose, the re-use should remain true to the building's original design and architectural style. Residences should not be significantly altered to accommodate a commercial purpose. If the basic layout and square footage of the structure is not sufficient, adaptive reuse for the particular function may not be appropriate. The size of the structure contributes to the scale of an historic district, therefore, caution should be used if it is necessary to enlarge a structure when adapted to a new use.
Do not alter the size, number, or style of window openings. Alterations to the entrance doors and door openings may be considered necessary to provide accessibility. Retain floor plans and elements of the historic interior that help define the character of the building; including size and configuration of rooms. Service areas and new stairs should be located in secondary spaces. Avoid altering spaces that are significant to the building's character, including subdividing spaces or cutting new holes in floors and ceilings. Avoid covering historic features, including the installation of drop ceilings that will cover ornamental ceilings or interfere with the tops of windows and window trim. Retain character-defining features and finishes such as columns, baseboards, fireplaces and mantels, and plaster. Avoid the removal, relocation, or alteration of historic stairs from their original configuration and location. New mechanical systems should be designed and installed in a way that will not harm character-defining spaces, features, or finishes.
Parking should be in proportion to the property and the building in both placement and scale. However, it should be carefully planned to direct patrons to the front door of the building, rather than a secondary entrance.
(64) ADDITIONS AND NEW CONSTRUCTION
A. ADDITIONS
Construction of an addition can often solve the need for more space. Because an addition can have a significant impact upon the character and appearance of an existing building, the design must be developed carefully. Owners should take into consideration issues of form, scale, proportion, materials, placement, and detail. The addition must meet the Kent Zoning Code, which is generally concerned with lot size, setbacks, placement, and parking.
For additions, material should be chosen for its compatibility with those of the original building. It is not necessary to use exactly the same materials (a frame addition is appropriate for a brick building, for example), but avoid materials that are not appropriate to the style and time period of the original structure. Scale, form, massing and quality are important even when discussing only materials.
Brick, stucco, or beveled siding all may be appropriate, depending upon the original building material. For example, a masonry building could have either a masonry addition, such as brick or stucco, or a frame addition. For an original wood building, on the other hand, a frame addition would be appropriate, while a brick or stucco addition most likely would not.
B. NEW CONSTRUCTION
Limited opportunities exist for new construction because development is restricted by the amount of land available. A new structure is classified as either an "infill" building or a "freestanding" building. An infill building is any new building constructed on a site with one or more of its walls adjoining adjacent buildings. The infill site is one that is vacant because it was either never developed or a building was removed from the site. A freestanding building is on an open site some distance away from any neighboring buildings.
The demolition of existing historically or architecturally significant structures to accommodate new construction should be discouraged, unless it can be demonstrated that the physical condition of the building has deteriorated significantly, that a practical use of the building is not feasible, or that the renovation of the building is economically impractical.
An addition or new structure should fit within the context of the existing building and its surroundings (for both an addition and a new structure). Compatibility can be achieved by relating to scale, form, massing, and the building elements discussed in these Guidelines (see "Impact on Design" on page 26.) Quality design, materials, and craftsmanship should be incorporated in additions and new construction. Setbacks from the street should remain consistent with what was established. Commercial as well as residential structures typically maintain a common setback that defines the space created by a streetscape. Existing additions may be retained if they contribute to the character and historic integrity of the structure.
(65) ACCESS FOR PEOPLE WITH DISABILITIES
When carrying out work on an existing building or constructing a new building, accommodations must be made for people with disabilities in accordance with established regulations. The Americans with Disabilities Act (ADA) is a Civil Rights Act intended to offer people with disabilities the same opportunities and enjoyment as the general public in employment, access to public buildings, and transportation.
In turn, businesses will benefit from the additional patronage. This Act applies to existing and new structures, including spaces that are leased for public use. Title V (ADA) specifically addresses building additions, alterations, and historic preservation.
Regulations for Building Accessibility:
ADA Accessibility Guidelines (ADAAG)
State and local building codes
Note: Code requirements allow for some exceptions for historic properties. (See chapter 34 of the Ohio Building Code-based upon the International Building Code.)
Additional information and assistance is available from the local ADA & IT Technical Assistance Center, funded by the U.S. Department of Education.
-National Institute on Disability and Rehabilitation Research
Title V, Section 4.1.7 of the Act "Accessible Buildings: Historic Preservation" provides some flexibility in meeting accessibility requirements where such requirements would threaten or destroy the historic significance of the building. Some provisions of ADA apply regardless of whether an existing building is undergoing a complete rehabilitation. The need to comply with ADA already exists; the need to meet the building code is triggered by a decision to rehabilitate.
Concerns about the applicability of ADA to your building, or about whether the historic preservation provisions may provide flexibility with compliance, may be addressed with an architect with preservation and compliance experience. Ramps and lifts sometimes needed to provide the disabled with access to buildings can have a significant visual impact: their location, design, and materials are important. These elements should be designed to minimize their impact on the entry facade. The design of ramps and handrails should be simple and contemporary and not necessarily try to mimic any existing handrails. Materials should be the same as or similar to those used in the building itself.
Avoid non-traditional materials such as unpainted wood. Also avoid solid masonry walls, which can make a ramp much more visually prominent than it needs to be. If providing access to a building's front entrance is only a matter of overcoming a few inches difference between sidewalk and entrance, consider re-doing a portion of the sidewalk so that it is sloped upward to accommodate the height difference. In such a case, a handrail may not even be necessary. Likewise, if the building is set back from the street, often the grade can be sloped to avoid the appearance of a "ramp".
Consider use of a lift rather than a ramp in some cases. Experience has shown that when the height to be overcome exceeds about three feet, ramps and lifts tend to cost about the same. A lift can be especially useful when space for a ramp is limited, or when the visual impact of a ramp would be too great.
(66) BUILDING COLOR
New methods for making paint and pigments expanded the range of colors available during transitions in historic styles. Color is directly associated with the historic architectural style and the concurrent advancements in technology. Largely impacting the character of the structure, color is a distinctive element of the building design.
The expression of color in a commercial structure may be slightly different than that of a residential structure. The predominant color should be complemented by the paint colors selected for the trim, ornamental details, doors, windows, and storefronts. Considerations for color selections should include the architectural style and how the selected colors work together (including color inherent in the masonry).
While paint analysis to reveal original colors is often possible, such analysis is not always necessary. Conducting a bit of research into an historic building and its style will give the owner a basis upon which to select colors. Finding a typical regional example of the style is an excellent guide (see Appendix D for reference). Generally, a guideline for color is to consider the building in three parts: the main body, the trim, and the window sash and doors. The architectural style is a basis for which elements are different colors and which elements are the same. Much documentation is available for this type of information. When it is appropriate to use multiple colors for the main body, changes in color generally occur where different materials are used. Some architectural styles are distinct because of the use of accent colors. Consider the building as a whole; and be selective when choosing what to accent. The key to the selection and application of colors is consistent across the facade. For example, all window sashes should be the same color. Painting of brick is not recommended.
Be sure, to follow proper preparation procedures so that the time and effort on color selection is not wasted on prematurely failing paint!
When approaching the Design Review Board for a Certificate of Appropriateness for a painting project, there are two appropriate options:
- Repaint using the same colors that are already on the building and the same color scheme.
- Propose a well-researched color palette, as described herein.
(67) SITE CONSIDERATIONS
Though these guidelines tend to focus on buildings, their sites are also of importance, as the land on which the buildings sit is part of the streetscape. In planning for the building site, whether planning a new building, alterations or additions to an old one, or just site improvements around an existing structure, there are several things to keep in mind. The site is a significant factor in the interpretation of a place because it is experienced at a variety of levels depending on the observer.
When walking past a building, the scale of the facade dramatically changes, in comparison with observation made from a vehicle. Conserving the views of and from a site (view sheds) are considered part of the preservation of a property.
(68) LANDSCAPING
Consider landscaping as an important element of the building site. Well-designed or well-planned landscaping can have a positive impact. Less, rather than more, landscaping is the better choice. Too much vegetation near the structure may cause moisture problems for the building and can be hard to maintain. Keep vegetation twenty-four (24) inches from the base of the building. Avoid obscuring picturesque views with too much landscaping. The ideal approach to landscaping an historic property is to find historic photographs and see the approach originally taken with the property. Often owners are surprised to see the historic approach is within the budget and healthy for the building. Historically, 19th century structures did not have abundant foundation plantings.
(69) FENCES AND WALLS
Fences and walls are traditionally used as boundary markers and security features. While these elements are appropriate for Kent's residential areas, and some commercial buildings, consider using traditional types.
Examples may include low masonry walls, picket fences, board fences, wrought iron fences, or fence rows of trees and shrubs on larger properties. Avoid non-traditional materials such as concrete or "cyclone" fencing and avoid nontraditional wood or vinyl fencing designs like basket-weave, shadowbox, or stockade fences. Paint or an opaque stain is appropriate for wood fencing. Fences that are added to the front of the building should be limited in height but still be in scale with the building.
(70) PARKING
Historically, buildings were approached from the front or main entry. It is difficult to provide enough parking to suit everyone's desire to be close to the front door. Common parking areas or lots that do not interrupt the streetscape are a good approach to a difficult problem. The Zoning Code will require a certain number of parking spots for most building types. Work with the Zoning/Engineering Department on the placement of parking. Try to avoid off-the-street parking in the front of buildings. Try creative uses of space. Some building uses may allow an owner to share parking with others. (For instance: The synagogue needs parking on Saturday and the church needs parking on Sunday-they could use the same lot instead of building two (2).)
(71) DECKS
Sidewalk tables and patio areas may be more appropriate to historic commercial structures depending upon the actual building site than the contemporary vision of a wood deck. A deck may be considered appropriate if it is shielded from public view by the structure and if it is constructed so that it can be removed in the future without damage to the structure. Large decks and patios should be limited to the rear of buildings. Wood decks should be kept low to the ground and finished with either paint or opaque stain to complement the colors of the historic building. Patios may be constructed of concrete, brick, slate, stone, pavers or other material that is compatible with the existing historic building in color and texture.
(72) WINDMILLS AND SOLAR PANELS
These items must not be visible from a public street.
(73) DEMOLITION
The demolition of existing historically or architecturally significant structures to accommodate new construction should be discouraged, unless it can be demonstrated that the physical condition of the building has deteriorated significantly, that a practical use of the building is not feasible, or that the renovation of the building is economically impractical.
(74) MOVING
Although moving a building is preferred over demolition, moving is considered the last resort to save a structure. Because a building's connection with its original site is a primary defining feature of the structure's character, separation from the site creates an interruption in the history and significance of the structure. If the Architectural Review Board permits the relocation of a structure, the building should be placed on a site that resembles the original site.
(75) GENERAL
Guidelines in this section are for reference purposes and are intended to assist owners of historic properties in the maintenance of historic materials. Regular maintenance of a structure often prevents the need for costly repairs in the future.
When property owners apply for federal tax credits, proper treatment of historic materials is required for these properties listed in the National Register of Historic Places. Buildings that are located in the Kent Design Overlay District require appropriate treatment to maintain the integrity of the historic districts.
The maintenance of an historic building should be fully evaluated before rushing to the local store for materials. This approach will provide a more long-term remedy, instead of just a quick patch. Proper planning can often save time, effort, and expense. When repairs are necessary, note the following general guidelines from this manual, as based upon the Secretary of the Interior's Standards for Rehabilitation.
The purpose of repairs is not to make historic buildings look new but to preserve and protect the original materials. Some signs of aging contribute to the building's character, and retaining the character of the building is the purpose of these design guidelines. Likewise, artificial aging should be avoided. Work performed on an historic structure should be carried out using the least intrusive and least destructive methods that will obtain the desired result. Damaged elements should be repaired rather than replaced. Where elements must be replaced, utilize materials and methods that match the appearance and quality of the original as closely as possible.
(The services of an architect experienced in historic building materials are often beneficial to the property owner.)
Note: Preservation Briefs provided by the U.S. Department of the Interior provide valuable information and guidance on maintenance and repair of historic properties and materials.
PROCESS FOR REPAIRS
1. IDENTIFY THE PROBLEM-Identify the location and extent of the perceived problem.
2. DETERMINE THE CAUSE OF THE PROBLEM- Carefully consider what may be the underlying cause of the problem.
3. TREATMENT FOR THE PROBLEM-Determine a treatment method to remedy the problem and repair the damage.
(76) IDENTIFY THE PROBLEM
Identification of the problem is primarily done by observation. Problem areas most often appear different in color and/or texture. A visual survey of the entire building will provide a comprehensive list of conditions.
It is important to determine the extent of the problem, including the depth of the deterioration and how large an area it encompasses.
(77) DETERMINE THE CAUSE OF THE PROBLEM
An unsightly or deteriorated area may only be an indicator of a more serious issue occurring in the structure that may not be clearly visible. Therefore, determining the cause is usually more difficult than identifying the problem and requires more active investigation. The cause of the problem must be resolved before the damage can be repaired; otherwise, it may soon reoccur. Remember that problems inside the building are often indicative of a problem with the exterior walls, roof, or foundation.
(78) FREQUENT PROBLEM CAUSES
A. An underlying problem (for example, insect infestation in moist wood) may have a related cause. The roof leaked, allowing the wood framing to become soaked, inviting insects that reside in wet wood.
B. Inappropriate or inferior materials, especially those from prior repairs, are often more susceptible to failure than the building's original fabric. For instance, repointing a 19th century building with a high cement content mortar will likely cause the masonry to crack which is an irreversible problem. Another example may be replacing a six-inch copper gutter with a four-inch aluminum one that has the potential to fail because it is too small to carry the water runoff; it also has the potential to fail because the dissimilar metals can result in galvanic action when they are connected, increasing the opportunity for corrosion and leaking.
C. Poor workmanship or installation can also be a source of problems. For instance, if the flashing is not properly installed on a roof valley, water can seep into the building, soaking interior walls or ceilings and may not be discovered until the plaster is so wet that it falls off the lath. If the gutters are installed without a positive slope toward the downspout, the building is at risk for ice dams in the winter and overflowing gutters in times of heavy rainfall.
(79) TREATMENTS FOR THE PROBLEM
Some conditions initially determined to be problems may not require repair. If the condition has stabilized and it is not adversely affecting the structure in any way, it is likely that no further work is necessary (for instance, if there was initial settlement at the time the building was erected, but no further movement in the last eighty (80) years, there is probably nothing to warrant concern.) If the condition is worsening or the structure has been compromised, repairs must be made to prevent further damage to the building (for instance, if the initial settlement was so drastic that the masonry cracked through three wythes of brick and the plaster, allowing water to enter the building then perhaps there is reason for concern.)
In light of the concept of lowest level of intervention possible, the treatments should be considered in the order of least invasive first. Can we repair the crack inside? Can we repair the crack on the outside and repair the plaster on the inside? Must we replace the outside wythe of brick and repair the rest? Must we replace two (2) wythes of brick and cut out the damaged plaster to replace that portion of the wall? It should be understood that the least invasive methods are generally the best for the historic structure and the best as an economic approach to the work as well.
(80) MASONRY
Brick and stone are two of the most durable historic building materials, but they are still susceptible to damage caused by inappropriate repairs and cleaning methods.
(81) IDENTIFY THE PROBLEM
Indicators of problems in masonry include, but are not limited to:
Bulge in the wall.
Cracks in the masonry.
Open joints.
Deteriorated or broken masonry.
Dirt or stains (discoloration).
(82) DETERMINE THE CAUSE OF THE PROBLEM
The majority of problems in masonry are caused by movement or moisture. Movement may be due to settlement of the building over time, a weak foundation, or compromised structural elements such as window and door headers. Movement can also be caused by the vibration of trucks passing by buildings located close to a road. Movement in a masonry building is most evident by a bulging wall or cracked masonry (for example, a step crack that extends from opening, to opening, to the top of the wall.)
Moisture can travel up walls through capillary action (wicking), run down walls from gravity, or enter walls from the interior through condensation caused by a difference in temperature between the interior and exterior of the building. Excessive moisture is often present where masonry is deteriorated or broken. It is often marked by a darker shade in color caused by dampness or a white haze caused by efflorescence (salts that leach from the masonry.)
Dirt and staining are primarily an aesthetic concern and rarely cause damage to masonry. Exceptions to that statement include years of accumulated carbon deposits from industrial pollution and some forms of biological growth. Stains may include rust and copper from adjacent metals, graffiti, paint, oil, tar, and organic matter such as moss and algae.
(83) MORTAR
Re-pointing is most often necessary where masonry repairs are required. Mortar joints provide level bedding for masonry units to sit and will absorb stresses occurring in the masonry due to expansion, contraction, moisture migration, and settlement. The appearance of mortar joints also contributes to the aesthetic quality and character of the building.
(84) IDENTIFY THE PROBLEM
Indicators of problems in mortar joints include, but are not limited to:
• Disintegrating mortar.
• Cracks in mortar or open mortar joints.
• Loose masonry units.
• Damp walls.
• Damaged finishes on interior.
(85) DETERMINE THE CAUSE OF THE PROBLEM
Similar to masonry, problems in mortar joints are often caused by structural movement, moisture, or improper mortar composition and placement. The causes must be addressed prior to re-pointing.
(86) TREATMENT FOR THE PROBLEM
After addressing the cause of the problems, the first step of beginning a re-pointing project is to analyze the historic mortar to determine its physical and visual characteristics. A sample of un-weathered, original mortar establishes the parameters for the new re-pointing mortar as defined herein. If the building is an income-producing property for which the owner seeks tax credits or grants, the mortar must be analyzed by a qualified lab to determine its composition.
(87) REPOINTING MORTAR
Should match original in color, texture, and tooling. (Sand defines the color and texture).
Joints should be raked out and cleaned so that the depth of the repointing mortar can be at least one and one-half (1-1/2) times the joint width.
Must have greater vapor permeability than the masonry.
Must be at least as vapor permeable and soft as the original mortar.
Must be softer (in compressive strength) than the masonry.
Visual examination along with a mortar analysis by a qualified laboratory will assist with satisfying each of these parameters. Matching the appearance of the original mortar joint is essential to maintaining the aesthetic quality of the structure. A mortar analysis is particularly helpful in identifying the sand by gradation and color. Greater vapor permeability is required to prevent excessive moisture absorption in the brick which can show up as unattractive efflorescence on the surface or sub-florescence below the surface, which can damage the masonry causing pieces of brick to fall away known as spauling or delamination. A mortar that is softer in compressive strength than the masonry allows for flexibility in the masonry system so that stresses within the building do not crack or break the masonry units. Re-pointing mortars typically should be custom mixed in order to match the characteristics of the original mortar.
Traditional mortar was composed of lime putty, sand, and water. Portland cement was patented in Great Britain in 1824 and became commonly used in the United States in the early 20th century. Initially, Portland cement was used as an additive to speed the set time of the traditional mortar. By the 1930s, it became a main ingredient, producing a harder mortar. The significance of the difference in compressive strength between traditional and modern mortars is critical when working on an historic structure because of the damage that modern mortar can cause to the historic masonry. In addition, caulking is generally an inappropriate treatment for masonry-to-masonry joints. The integrity of the masonry wall and the historic structure is dependent upon proper successful re-pointing.
(88) WOOD
In response to rising concerns about fire safety by the end of the 19th century, wood typically was limited to window frames and sashes, storefronts, ornament such as cornice details, and framing within "fireproof" masonry and steel structures. Exposed wood was painted for protection. Sometimes, wood supports and cornices were covered with sheet metal for aesthetic reasons. Wood has remained a popular building material because it is flexible, performs well structurally in tension and compression, and is easy to use. Wood, however, is most susceptible to moisture- related deterioration, insect and biological attacks, weathering, and fire.
(89) IDENTIFY THE PROBLEM
Indicators of problems in wood include, but are not limited to:
• Paint failure (visually apparent).
• Decay/Rot (soft, crumbly, or cracked wood).
• Insects (small holes and/or bore dust).
• Ultraviolet degradation (dry, gray, split wood).
(90) DETERMINE THE CAUSE OF THE PROBLEM
Excessive moisture is the primary cause of deterioration in wood. Moisture can cause paint failure and facilitate fungi that cause decay and rot. This makes wood susceptible to insects which feed on wet or rotting wood. Paint failure can occur when water that has infiltrated the wood cannot escape from the wood because the paint coating has created an impenetrable vapor barrier.
The water continues to try to escape until the coating fails, allowing the moisture to be released. Decay, also known as rot, is caused by fungi that feast on wood. Signs of decay include areas of soft, spongy, crumbling, and cracked wood. Fungus often grows through the center of a wood element and is therefore not readily visible. Decay may be identified by poking questionable areas with an ice pick or an awl; if the wood is decayed, it will come up in short, irregular pieces. Long, fibrous splinters typically indicate the wood is sound.
(91) CONDITIONS
Fungi require three conditions. If any one of the three is not present, decay cannot survive, though it can lay dormant until the three conditions are again present.
Signs of fungi:
• Suitable temperatures (typically between 50-90 F).
• A small quantity of air.
• Sufficient moisture.
Signs of insect infestation:
• Subsurface galleries or tunnels.
• Wood bore dust, excreta, and other debris found in or around tunnels or galleries.
• Exit holes one-sixteenth (1/16) to one-fourth (1/4) inch in diameter and circular or elliptical in shape, fragments of deceased insects.
Insects are attracted to moist wood because it is soft and easy to ingest or bore through. Wood used in the northeastern United States can be attacked by beetles, termites, carpenter ants, wood-boring bees and insects that attack just one species like the Emerald Ash Borer. Much of the damage is done while the insects remain hidden from view, but they can be identified by the evidence they leave behind.
Ultraviolet Degradation:
• Dry, gray wood.
• Deep fissures, split wood.
• Lack of integrity, wood will break (with the grain) easily in your hands.
If there is any reason to believe that insects are present, consult a professional exterminator for advice prior to making repairs. Suitable treatments for damaged wood include consolidation and filler, patches, and full replacement.
Consolidants and epoxy fillers strengthen and stabilize the damaged areas of wood. This type of repair can be even stronger than wood and can be shaped and painted like the original wood. Damaged areas also may be replaced by patches of wood that match the original material and are installed by traditional methods such as a "dutchman." Full replacement of wood members or elements is the extreme and should be done only when absolutely necessary.
Steps for Wood Repair:
• Allow wood to be completely dry.
• Remove only damaged areas back to sound wood. Keep in mind that the extent of the damage may have spread farther than what is visible, especially in cases of rot and termite damage.
• Make appropriate repairs.
• Treat wood with a preservative to prevent future attacks.
• Paint wood when it is required or appropriate.
Some species of wood are naturally resistant to decay, to insects, and to ultraviolet degradation. Teak and mahogany are highly resistant to decay. Cypress, redwood, walnut, white oak, and locust are relatively resistant. Spruce, red oak, birch, and poplar are more susceptible to decay and should not remain exposed. When replacing wood in whole or in part, it is essential to consider the original species so that the old and new elements will act in the same manner.
It is encouraged to research the origin of wood that you may be considering. If the considered wood comes from an endangered rain forest it is encouraged to select a different origin of wood.
(92) EXTERIOR PAINT
The exteriors of historic buildings are painted for two primary reasons: to protect and preserve exterior building materials and to create color schemes appropriate for their architectural style and articulation. Paint is a protective coating which aids in deterring the harmful effects of weathering such as moisture, ultraviolet (UV) rays from the sun, and wind. Paint requires maintenance and renewal to ensure a building's long-term preservation, and reapplication is necessary about every 5-8 years. Paint also enables the owner of an historic building to enhance the architectural style with original or appropriate period colors that can be applied for a relatively modest cost.
(93) IDENTIFY THE PROBLEM
Indicators of problems and types of paint failure include, but are not limited to:
• Mildew, soiling, staining, and chalking (powdering of the paint surface).
• Crazing and blistering.
• Peeling, cracking, and alligatoring (advanced crazing resulting in deep open cracks).
(94) DETERMINE THE CAUSE OF THE PROBLEM
Neglecting to correct the causes of paint failures and problems, or neglecting to repair deteriorated exterior materials prior to repainting, will cause new paint work to fail prematurely. Improper application of paint, general weathering (UV rays from the sun, rain, and wind), the presence of excess moisture, and moisture infiltration are the primary causes of paint failure. Leaking roofs, deteriorated flashings, leaking or missing gutters and downspouts, and overgrown vegetation are the most common sources of excess moisture that affect exterior paint.
(95) TREATMENT FOR THE PROBLEM
It is important that a building be repainted before its paint fails and allows moisture to penetrate to the substrate causing the paint to deteriorate at an accelerated rate. Good surface preparation is the key to a long-lasting finish; however, it is not always necessary to remove paint to bare substrate before repainting. Removing all of the paint negates the ability to conduct analysis of historic colors as well as other information about the history of the property. Soiling, staining, mildew, and chalking generally do not require paint removal and can be treated by thorough surface cleaning and preparation prior to repainting. In most cases, these conditions can be treated with the application of a mild non-ionic detergent and scrubbing with clean water and natural-bristle brushes. Areas with mildew also should be treated with a bleach and water solution.
After cleaning, rinse with low-pressure water (garden hose pressure-do not use high pressure) and allow the surface to thoroughly dry. If rust stains are present, remove rust from suspect metal surfaces and coat with rust inhibiting primer. Countersink exposed nail heads and fill with high quality wood filler. Crazing and blistering, in most cases, can be treated with limited paint removal. Scraping and light sanding (hand or mechanical) to a sound surface and properly repainting is the best method for repairing crazing and blistering.
Although some hairline cracks and imperfections may translate through the new paint, feathering down the high points and the application of an additional coat of primer in these areas may lessen the effects. Peeling, cracking, and alligatoring usually require paint removal down to sound substrate. If these conditions are present only in the top layers, they can be treated the same as crazing and blistering. However, if the conditions have progressed to bare wood and the paint has begun to fail, it will need to be removed by scraping, sanding, heat guns, or chemical strippers,
depending on the type of substrate and the particular area involved. Bare wood should be primed within 48 hours and then repainted. Open flame "blow torches," sandblasting, or water-blasting must not be used to prepare a surface for repainting. Chemical methods may be used after testing trials prove to be successful and do not cause damage to substrates or adjacent materials. Care should be taken to rinse chemical residue from the surface prior to repainting or the paint will not properly adhere. It is important to note that the least amount of water should be used for the paint removal process because it will be absorbed by the wood and may raise the wood grain, or leach into the building. Always use the gentlest means possible.
Based on the assumption that the exterior of the building has been painted with oil paint in the past, it is recommended that a high-quality oil-based primer be applied first. After the primer has thoroughly dried, apply finish coats of either oil-based or 100% acrylic latex paint. Read the labels or ask the advice of a paint expert in order to determine the best quality paint with the least environmental impact.
Regardless of what type of paint is ultimately used, some basic rules should be followed when painting:
• Substrates should be sound and properly prepared.
• Substrates should be thoroughly dry.
• Latex finish coats should not be covered with alkyd resin oil paints; they will not properly adhere.
• Both primer and finish paints should be from the same manufacturer and meet the manufacture's compatibility requirements.
• Follow the manufacturer's recommendations.
(96) ARCHITECTURAL METALS
Metal is found in the decorative columns, cornices, and brackets of the late 19th and early 20th century storefronts. Of these metals, iron and steel are by far the most common, followed by copper and copper alloys, zinc, lead, nickel, and aluminum. Metal architectural features should be identified, retained, and preserved along with their finishes.
(97) IDENTIFY THE PROBLEM
Prior to starting any work, it is necessary to identify each metal element by its type and its condition so a proper treatment can be prescribed. Determining metallic composition can be a difficult process, especially if components are encrusted with layers of paint.
Indicators of problems and types of metal damage include, but are not limited to:
• Corrosion/Rust (oxidation or galvanic).
• Impact damage (dents, holes, gauges).
• Failed joints or seams; damage to connections; fatigue and creep.
• Loss of anchorage to backup materials and structural failure.
• Missing elements.
(98) DETERMINE THE CAUSE OF THE PROBLEM
After identifying metal types and conditions, the causes of the problems must be determined before repairs are implemented. In general, the primary causes of metal deterioration and failure include high concentrations of moisture and air pollution; wind; general neglect and abuse; poor original design detailing and installation; and failure of protective finish coats.
Corrosion occurs rapidly when metals are exposed to moisture and air and it is exacerbated with the presence of high concentrations of airborne salts, sulfur, and other acid compounds. Galvanic corrosion is an electrochemical action that results when two dissimilar metals react together in the presence of an electrolyte such as water containing salts. Corrosion is accelerated in situations where architectural details provide pockets or crevices to trap and hold liquid corrosive agents and where protective finishes have deteriorated.
Physical deterioration such as failed seams and connections and fatigue are usually caused by a combination of environmental conditions, physical stresses, and insufficient design details.
(99) TREATMENT FOR THE PROBLEM
Protect architectural metals from deterioration by maintaining protective finishes, providing proper drainage, and preventing water from standing on horizontal surfaces or accumulating in curved, decorative features. Suitable treatments for metals include cleaning and maintenance, repair, and selective replacement.
(100) CLEANING AND MAINTENANCE
Clean ferrous metals or aluminum to remove corrosion prior to repainting or applying other appropriate protective coatings. Do not remove historic patinas found on some metals such as copper or bronze as this will diminish the metal's historic character and may accelerate deterioration.
• Test to ensure that the gentlest method possible for cleaning is selected or to determine if the cleaning method is appropriate for that particular metal.
• Clean soft metals such as tin, lead, copper, terneplate, or zinc with appropriate chemical methods to ensure their longevity and performance.
• Use mild chemical treatments for cast iron, wrought iron, and steel (hard metals) in order to remove paint buildup and corrosion. If hand tools are ineffective, low-pressure blasting with dry grit may be used on hard metals (but not soft) by experienced personnel. If the corrosion is minor or if its complete removal is not feasible, the application of a rust "convertor" or "inhibitor" may be advantageous.
• Newly cleaned or bare metal should be immediately coated with a corrosion inhibiting primer before new rust begins to form.
• Apply an appropriate and compatible finish system after applying primer (except on metals meant to be exposed, like stainless steel, copper, or bronze).
• Repaint architectural metals with historically appropriate colors.
• To prevent water penetration at seams, joints, and connections, replace deteriorated or missing caulk with a high-quality architectural grade sealant.
(101) REPAIR
• Repair architectural metal features by patching, splicing, or otherwise reinforcing the metal following recognized conservation methods and techniques.
• Minor damage or losses may be repaired utilizing epoxy resins or polyester-based patching compounds.
• Some damage may require patching or mending with another piece of metal. To prevent galvanic corrosion, the patch materials should be a very close match to the original material. Fasteners and hardware, including solder and welding material, should also be compatible with the materials that they contact.
• Repairs may include limited replacement in kind or with small amounts of approved material. Use surviving prototypes of the original features as models, for example: cornices, balusters, or column capitals.
(102) REPLACEMENT
When architectural metal components are beyond repair or when the repairs are only marginally sufficient in extending the functional life of the member, replacement of the deteriorated element is often the only practical solution. If the metal has been deteriorated to a point where it has actually failed, duplication and replacement may be the only course of action.
• All attempts should be made to make replacements with like materials. Replacements should duplicate the appearance of the existing original element by matching the original's composition, size, and configuration of details. If replacing a structural element, the structural characteristics of the original also should be matched.
• Reproductions or replacements should be based on historical, pictorial, or physical documentation.
(Ord. 2021-057. Passed 6-16-21.)